HOW TO EDIT YOUR WEBSITE
This document is intended to speed you through the different features on your website, and how to edit or create each of them.
As this site was a designed as user friendly Divi site, our designers created the tools to make the site incredibly simple to navigate and update.
For ease of use, all sections (layouts) currently built on the site have been saved into a Library, where you can easily replicate specific modules or even an entire page template.
When editing or creating new pages, if your page is not looking as it should, go to one of these pages mentioned below and click edit. Then view the section and modules to double check the formatting that was applied to them and apply the same formatting to the element you are working on.
Editing Instructions
- How to edit pages:
- Click All Pages
- Click Add New button to create a new page
- Click page name to edit an existing page
- Click save draft button if you do not want page to go live yet
- Click All Pages
- Content Editor (WYSIWYG)
- Type content directly into the wysiwyg in HTML Fields Tab or copy/paste from word processor with ease
- When copying/pasting, ALWAYS use the clear formatting button!
- Use special characters button for all special characters. If not, the coding may be different.
- Font Styles Selection
- Different font styles, including headers, are chosen from the Format drop-down menu
- Block Quotes In Content Editor
- Highlight text to be put into block quotes
- Select block quote button
- Links
- Highlight the word/s which you want to create as a link and clicking on the insert/edit link icon.
- Enter the destination URL directly into the field or performing search.
- For internal links, insert page url only (eg: /about).
- For external links, insert the entire url (http://www.website.com) and click Open in a New Window/Tab box. For telephone “click to call” functionality add tel:phonenumber, and email insert mailto:[email protected]
- To add a CTA Link, highlight the link, and in the format menu select CTA Link
- To break a link, highlight linked text and click Remove Link button (broken chain)
- Inline Images
- To add an in-line image, place your cursor on the area where the image should appear, and click Add Media button above wysiwyg
- Click on the little chart symbol to open the media library
- Scroll to find an image or search using field in top right corner, select it, then click Insert Into Page button
- Upload and find the image on your computer (EDIT ALL IMAGES IN IMAGE EDITING SOFTWARE BEFORE UPLOADING TO FILEBIN PLEASE) and upload. Then select the image and click insert.
- Once the image is in place, click on image to reveal edit toolbar. Choose an alignment and add vertical/horizontal space if necessary.
- Click Update
- SEO Settings
- Search Engine Listing Tab
- Enter Title tags (max. 70 characters)
- Enter Meta Description (max. 140 characters)
- Search Engine Listing Tab
- Add a sidebar:
- When adding a new row or section, make sure to load the interior template saved in the library hosting the sidebar.
- You can add any modules (just like you regularly would here) i.e. Text, a map with a text box underneath, a testimonial, and so on!
- How to add sub-navigation to a page:
- Saved in the library for you is a standard interior layout with left navigation.
- You can add a layout from the library, and select this layout making the subnav automatically appear!
- Or, in other (normal) Divi:
- Click the page that should have sub navigation.
- Click Add Standard Section making sure there’s a predefined section for a subnav
- Add a sidebar module
- Once this is chosen, select sidebar from the widget area dropdown.
- Once the above steps are done, you will need to repeat for all pages of that section, including the parent page.
- NOTE: remember to reference the sample pages we created for you… you may want to open them in another window so you can cross reference the setup of your pages.
- How to edit the Media Library
- Click Media > Library > Add New
- Drop files into window or click Select Files button
- To Edit Images or other Media you may view as a list or Media Grid View
- Inside the Media Grid, media items are displayed in a thumbnail grid for ease of navigation. Click any media item to edit the image directly; however, we recommend that you use photo editing software like Photoshop. In this view, you may also edit the image metadata or media item metadata.
- Media library can be filtered by type or date and is searchable by title.
- How to add/update Menus:
- In order to build your mobile menus, and your secondary menus for specific pages, you will need to update the menu in WordPress.
- In left menu, click Appearance then Menus.
- In the Edit Menus tab, choose the menu you would like to edit from the drop-down menu and click Select.
- Edit Menu Name in field, if desired.
- Drag and drop each item into the order you prefer and/or click the arrow on the right of the item to reveal additional configuration options.
- Click red Save Menu button.
- How to edit the Footer Text block
- In left menu, click Appearance > Widgets.
- Click on Footer Area #2 or #3
- Click on the Visual Editor
- Edit the text in the wysiwyg
- Click red Save Menu button.
- How to add/update Forms:
- Go to “Ninja Forms” in the WordPress sidebar. Here you will see all of your existing forms.
- To create a form for a shop item:
- Find one of the “SHOP” forms in the list. Click the gear icon and duplicate the form.
- Edit the duplicate form and update the form items and form name to correspond with the new shop item that you are adding.
- To create new Form:
- Select Forms from the left navigation.
- Select Add New FormClicking on the Template Field on the left will populate the right side of the window the data needed for the form.
- Once desired form items are added and updated. Click Save
- Next select the “Email & Actions” tab
- Edit redirect, email admin and email user settings for each form
- Redirect – redirects to thank you page
- Email admin –You can customize the way each submission hits your inbox: from name, address, to email (very important), subject, and fields.
- Once the form is complete, copy the short code and paste into your wysiwyg.
- How to Create a PayPal Button to place on website
- Before creating the button in PayPal, set up your text link on the site. Create a text module to hold the button on its own (ie – without other text).
- Then type in your link text, such as “Donate $50” (for specific amounts) or “Donate” (for a general donation)
- You will add the link that you create in PayPal to this text once you have generated it
- Login to your PayPal account
- In the top menu, select “Tools”, then “All Tools” in the dropdown menu
- Select “PayPal buttons” option from this page
- Click “Donate”
- Fill in the “Organization name/service”, then choose “PayPal button” and de-select display credit card logos.
- Determine if you will allow donors to enter their own amount (ie: for a donation) or a fixed amount (ie: golf outing) and select the appropriate option
- To Customize the URL that the user should be sent to after donation is made, go to Step 4.
- Scroll down the page to select: “Route donors back to your site”
- In the case of the Golf Outing, the user would then be taken to fill out their registration form, after they make the donation.
- You can also send users to a custom Thank You page on your site after making a donation.
- Select “Finish and Get Code”
- You will see code in a window underneath the “Website” tab. Click on “Shareable URL” instead. There should just be one single link. Copy that link out. it should look something like this: https://www.paypal.com/cgi-bin/webscr?cmd=_s-xclick&hosted_button_id=QLFANL5D2GWUX
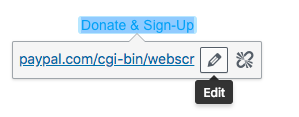
- Go back to the site. Remember the link text that you created in the top bullet? Highlight the text and click on the “link” icon. Paste your link into the field and then click “Apply”
- Highlight the text again to get the link box to show up again. Then click on the pencil or “Edit” icon.

- Once the new window appears, click on the “Gear” icon on the right.

- Once the window opens, click the checkbox to “Open link in a new window” Click the “Update” button
- Then “Save & Exit” and be sure to Update your page to save your changes.
- Before creating the button in PayPal, set up your text link on the site. Create a text module to hold the button on its own (ie – without other text).
Do you need more help?
Should you need further assistance, you can find specific instructions on the Divi Theme Documentation Website
If you cannot find your answer, submit a ticket to the Orbit Support team for assistance.
